From the first tutorial until this tutorial, the system clock that we use is internal RC oscillator (HSI) which the value is 16 MHz. This can be checked by using this simple code:
From the datasheet we know that STM32F407VG can run at 168 MHz. So, in this tutorial, I will explain how to configure the system clock at 168 MHz. The external crystal value of STM32F4 Discovery board is 8 MHz. The question that may arise is how to reach 168 MHz if the external crystal value is only 8 MHz? The answer is using PLL (Phase Locked Loop). The function of PLL is to multiply the frequency to reach high frequency.
This is the block diagram of STM32F407VG clock:
#include "stm32f4xx.h"

int main(void)
{
    // Update the system core clock variable
    // according to current clock register value
    SystemCoreClockUpdate();

    while (1);
}
SystemCoreClockUpdate() function is used for update SystemCoreClock variable that store the value of current system clock. To see this variable value, we can go into debug mode. In the Variables tab, do the right click and select Add Global Variables then select the SystemCoreClock variable. After that we can step over the SystemCoreClockUpdate() by using F10. After that line is executed, the SystemCoreClock is updated to 16 MHz in Variables tab.This is the block diagram of STM32F407VG clock:
As seen on clock block diagram above, in PLL block there is xN factor that will multiply clock frequency. So to get 168 MHz clock we must enable the HSE, set the multiply and division factor (/M, xN, /P, /Q), and change clock source to PLLCLK.
To calculate the multiply and division factor value, we can use tool that provided from ST Microelectronics called Clock Configuration Tool. Enter the HSE frequency which the value is 8 MHz, because the STM32F4 Discovery board use 8 MHz external crystal. Then set the HCLK frequency to 168 MHz. Finally click Run button to get the result.
After get the result (highlighted in orange), the we can use these values into code:
#include "stm32f4xx.h"
#include "stm32f4xx_rcc.h"
#include "stm32f4xx_flash.h"

int main(void)
{
    // Resets the clock configuration to the default reset state
    RCC_DeInit();

    // Enable external crystal (HSE)
    RCC_HSEConfig(RCC_HSE_ON);
    // Wait until HSE ready to use or not
    ErrorStatus errorStatus = RCC_WaitForHSEStartUp();

    if (errorStatus == SUCCESS)
    {
        // Configure the PLL for 168MHz SysClk and 48MHz for USB OTG, SDIO
        RCC_PLLConfig(RCC_PLLSource_HSE, 8, 336, 2, 7);
        // Enable PLL
        RCC_PLLCmd(ENABLE);
        // Wait until main PLL clock ready
        while (RCC_GetFlagStatus(RCC_FLAG_PLLRDY) == RESET);

        // Set flash latency
        FLASH_SetLatency(FLASH_Latency_5);

        // AHB 168MHz
        RCC_HCLKConfig(RCC_SYSCLK_Div1);
        // APB1 42MHz
        RCC_PCLK1Config(RCC_HCLK_Div4);
        // APB2 84 MHz
        RCC_PCLK2Config(RCC_HCLK_Div2);

        // Set SysClk using PLL
        RCC_SYSCLKConfig(RCC_SYSCLKSource_PLLCLK);
    }
    else
    {
        // Do something to indicate that error clock configuration
        while (1);
    }

    SystemCoreClockUpdate();

    while (1);
}
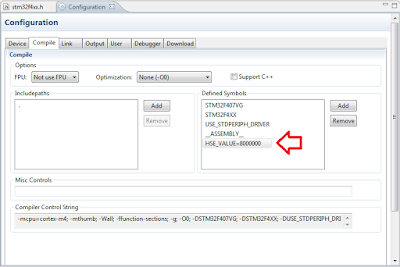
Before download code to flash, we must change the HSE_VALUE that has been defined in stm32f4xx.h. In that file the HSE_VALUE is defined at 25,000,000 Hz, so we must change that value to 8,000,000 Hz. Another way to change this value is from compile configuration. In compile configuration you can add new defined symbol HSE_VALUE=8000000.


Вот! То что надо! Класс))
ReplyDeleteThank you, have been using Crystal for a while now!
ReplyDeletecrystal water bottle benefits
Thank You for this wonderful and much required information
ReplyDeleteBuy Top Quality Research Chemical Crystal,
Sell Strong Research Chemical Powder in USA